By: Matt Sawicki, IT Student
Article Rating: ★★★★☆
Skill Level: Beginner
![]()
Before
After


html for beginners
By: Matt Sawicki, IT Student
Article Rating: ★★★★☆
Skill Level: Beginner
![]()
What is HTML?
HTML is a language for describing web pages.
• HTML stands for Hyper Text Markup Language
• A markup language is a set of markup tags
• HTML uses markup tags to describe web pages
In this tutorial you'll go through the steps to make a simple webpage using HTML. You can use other tutorials on this site to expand on your website and new things to make it better. This tutorial is meant as a starting point for beginners. All work can be saved and continued at a later time if needed
Everything you need should be standard on any home computer:
• A computer with a mouse and keyboard
• Internet connection
• Notepad (Word, Wordpad, etc. will do as well)
• Browser (Internet Explorer, Firefox, Safari, etc.)
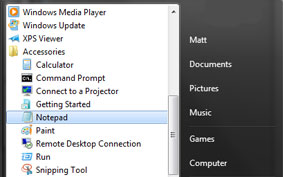
As stated in "What You'll Need" you can use any text editing program to write your HTML. This example will show Notepad on a Microsoft based OS, but others are pretty much the same.
Start > All Programs > Accessories > Notepad
The html element tells the browser that this is an HTML document. The html element is the outermost element in HTML and XHTML documents.
The body element defines the document's body. The body element contains all the contents of an HTML document, such as text, hyperlinks, images, tables, lists, etc.
The head element is a container for all the head elements. The title tag defines the title of the document, and is the only required element in the head section.
This is the code you'll need to begin your page:
You can add your own desired title between the two title tags
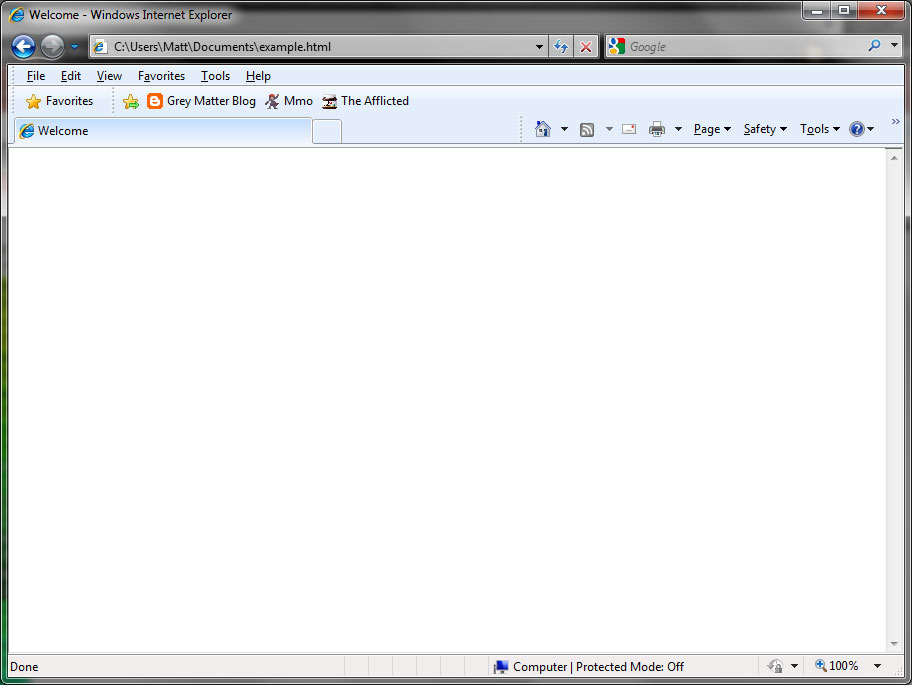
In this example we made the title "Welcome".

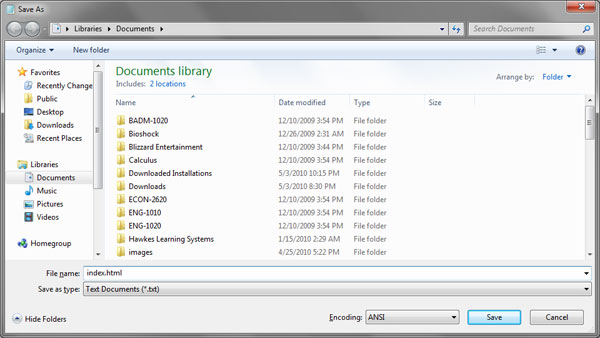
Save by going to File > Save As. Type a filename with an .html extension (i.e. "index.html")
When you save an HTML file, you can use either the .htm or the .html extension.
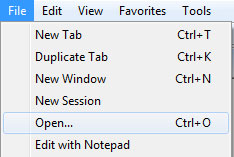
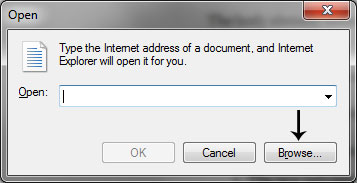
Open your browser (Internet Explorer, Firefox, Safari, etc.) and on the menu bar go to File > Open.
Click Browse and find/select the document you just saved. Your browser should show your webpage.
At this point there isn't much on your webpage, but the following steps show you how to add content to your webpage!
Note: You must save your .html document then refresh your browser to show changes you've made in your code.
Note: In steps 5-11 you will be adding various kinds of content in the body section of your HTML between <body> and </body>.
HTML has six levels of headings, numbered 1 through 6, with 1 being the largest. Headings are displayed in larger, or smaller fonts, and usually bolder. Headings go in the body section of the HTML (between <body> and </body>). If you wanted to type "Hello", this is what you would type for each heading, and what the outcome is:
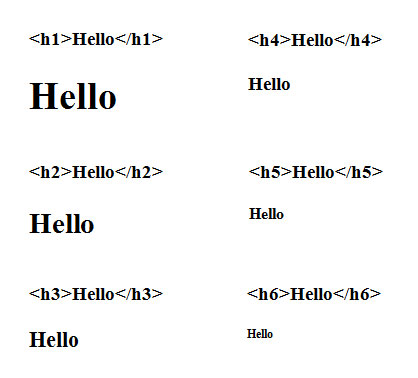
Code for Headings 1 to 6:
Whenever you have more than a sentence of writing, you should have paragraphs. The p element automatically creates some space before and after itself. The space is automatically applied by the browser. Paragraphs go in the body section of the HTML (between <body> and </body>). To make a paragraph of "This is my first web page! To learn how to make your own web site go to 'Starting a Website: HTML for Beginners'", type:
There are two types of lists that you can make in HTML, dotted, and numbered. The <li> tag specifies 1 list item. Lists go in the body section of the HTML (between <body> and </body>).
UL for unordered list (Bullet Points)
OL for ordered list (Numbered)
You may want to format some of your text differently than others using text styles. There are several types of styles of text that you can use: bold, italic, underline, strikeout, superscript, subscript, teletype, and text are examples. Styles go in the body section of the HTML (between <body> and </body>) surrounding text. To do these styles, surround your text with the following commands:
<b></b> for bold
<i></i> for italic
<u></u> for underlined
<strike><strike> for strikeout
<sup></sup> for superscript
<sub></sub> for subscript
<tt></tt> for teletype
<blink></blink> for blinking text (not recommended)
For Example, the word "Title" bold, italic, and underlined.
Title
The default behavior associated with a link is the retrieval of another Web resource. This behavior is commonly and implicitly obtained by selecting the link (e.g., by clicking, through keyboard input, etc.). By activating these links, users may visit these resources. Note that the href attribute in each source anchor specifies the address of the destination anchor with a URI. Let's say that you wanted to make a link from your web page, to Yahoo! The URL of Yahoo! is:
http://www.yahoo.com
To do this, you would type:
The result is:
Yahoo!
To display a graphic on some one else's page, you need to find the URL. To do this, I recommend that you have Netscape Navigator. Right click or click and hold down on the graphic, until a menu comes up. Choose "View this Image". Then , copy the URL that appears at the top of the screen, in the "location" box. Let's say that the URL was: http://www.make-a-web-site.com/pic.gif
You would type:

To display a graphic that is in your account, all you have to do is type in the filename. If you didn't make separate directories for graphics and pages, then you just need to type the graphic's name.
On most pages, you want to have a specific color for the background and your text. In order to do this, you need to find the code number for the specific color that you are looking for. Here is a hex color code generator to find the code for the color you're looking for. The code for bgcolor and text go inside your existing body tag.
Note: You must have the "#" sign before the actual code.
Here is an example of a body tag with bgcolor and text color attributes:
Here is an example of what your web page might look like after going through these steps:
1. Save often
2. Backup your work
3. Experiment with new concepts and tags to build on your website.
4. Ecessive use of styles and formatting can make your text hard to read.
5. Certain styles like blinking text are very annoying.
6. Choose a color scheme that makes your text clear and easy to read.
7. You should put all formatting on a Cascading Style Sheet (CSS). Later tutorials will show you CSS.
8. The <br /> tag starts a new line without skipping any space.
9. To draw a line across the screen, use <hr> (for "horizontal rule").
Useful Resources:
W3 Schools Great for learning more about HTML. Includes definitions, examples, and quizes.
Try It Yourself Editor Shows HTML code next to the resulting web page changes for convenience.
Color Scheme Designer Create your desired color scheme for your website and find hex color codes.
HTML Tag Chart 1 Handy reference for common HTML tags for your website.
HTML Tag Chart 2 HTML 4.01 / XHTML 1.0 Reference
Other Great How To Sites:
eHow Learn how to do just about everything at eHow.
Wikihow A wiki based collaboration: How to manual